Have you ever thought, what is the purpose of exhausting 4-5 hours daily on killer SEO strategies if the website’s loading speed is poorly optimized? Probably NOTHING! When someone is paying for good internet speed, they expect a flawless experience of surfing. If the text and multimedia are taking too much time to load or the input controls are not working instantly, the user will leave leading to an increased bounce rate.
Page loading speed is a crucial factor that decides its ranking status on SERP. For analyzing the page loading speed or to check website performance, Google has already introduced the PageSpeed Insight Tool. A user just needs to enter the URL and this smart tool deeply examines every single aspect affecting the loading speed. The collective results of processing a URL with PageSpeed Insight Tool are divided into three categories with red, yellow and green colors. As obvious, red represents the lowest score whereas green is meant for top scoring.

While analyzing the speed test results, you need to focus on the metrics of three major factors i.e.
- Lab Data
- Opportunities
- Diagnostics
These three factors further comprise various elements that you need to understand before using this tool. We will elaborate on all crucial website speed metrics and reliable solutions in the article below.
Lab Data
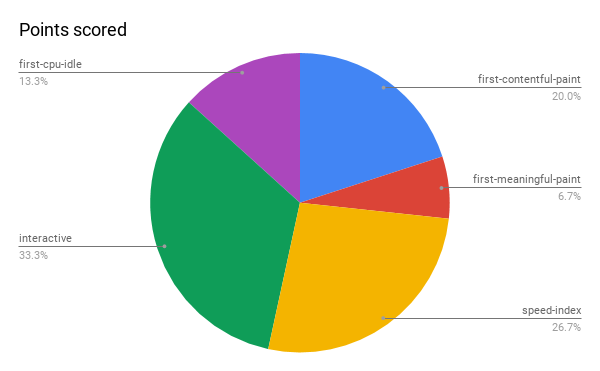
When you analyze a URL to check website speed in PageSpeed Insight Tool, it generates a performance score on the basis of different metrics. Each metric critically examines the data and gives a score labeling with green, orange and red color. Gain complete information about lab data metrics from the points below. Lab data comprises six different metrics with their distinctive weightage as we are mentioning below:-
| Metrics | Weightage |
| Time to Interactive | 5X |
| Speed Index | 4X |
| First Contentful paint | 3X |
| First CPU Idle | 2X |
| First meaningful paint | 1X |
| Max Potential FID | 0X |
Get precise data of metric values from the Lighthouse v5 Score Weighting sheet from here.
First Contentful Paint
The FCP aka First Contentful Paint is a performance measurement metric meant for examining the period from navigation to the time taken for the first-bit rendering by a web browser from Document Object Model (DOM). The “DOMHighResTimeStamp” of First Contentful Paint entry focuses on highlighting the time when any element such as text, image or canvas of a webpage was rendered initially. FCP is basically the first step to improve user experience. Therefore, pay critical attention to its optimization.
First Meaningful Paint
First meaningful paint is basically the time when meaningful content appeared on a web page. Meaningful content for every website differs on the basis of content it is serving. For instance, playing video is the first meaningful content for a video streaming website. Similarly, the text content or first image of a blog is its “First meaningful Content”. If you are getting positive results on FCP but the FMP is low, the bounce rate will automatically increase and you should see how to load what is meaningful as early as possible.
First CPU Idle
The initial point at which a web page responds quickly to an input is known as the First CPU Idle. This metric is still at its beta phase that is why its implementation is heuristic. It analyzes the loading when the page is minimally interactive. Reducing the size of critical resources can help in optimizing FCI.
Time to Interactive
There is a significant difference between watching content and gaining access to its features. For instance, the video streaming section of YouTube may appear instantly but its buffering period might ruin the user experience. The time taken by a web page to become fully interactive must be as low as possible, especially if it is a social media or video streaming website. If the user is continuously clicking on a button but not getting a timely response, consider it as a big turn off for the user and you should get your developers to fix it immediately.
Max Potential First Input Delay
The Max Potential FID measures the worst-possible first input delay. This metric is capable of measuring time in milliseconds to conclude the delay in responding to the user’s input. For instance, if the page is loaded and you are able to see the desired content, the total response time taken after clicking on a button is considered Max Potential. If the Max Potential FID score is appearing red or orange, your UX needs better optimization. 0-130 milliseconds response is considered in green, 130-250 in orange and beyond 250 in red.
Speed Index
Speed index metric of PSI tool examines page loading performance. The average time taken for displaying the visible part of a page is recorded in milliseconds. When we talk about “visible parts”, it excludes “time to become interactive”. In order to generate the speed index score out of 100, Lighthouse of Google uses “Speedline” node module.
Opportunities
Here is a list of opportunities that Lighthouse will flag when you submit a URL for website speed and performance tests. It will identify all unused and unnecessarily added elements responsible for slowing down the speed. Scroll down to check which issues are optimizable in your web page.
Serve Images in Next-gen Formats
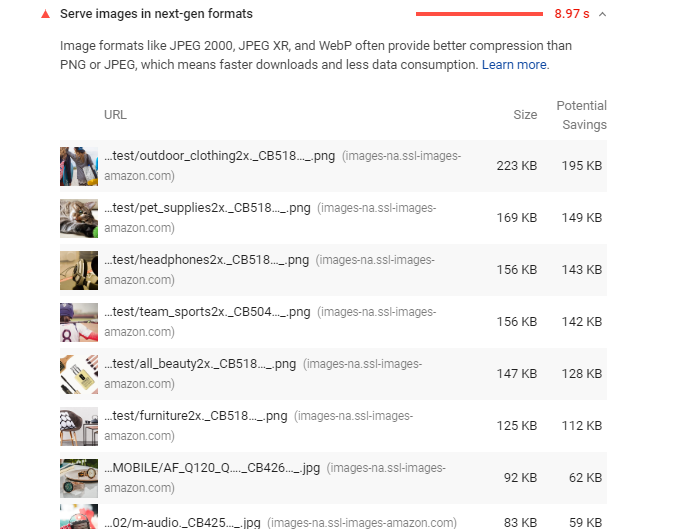
Heavy Images on your page will obviously slow down the page loading efficiency. JPEG and PNG are the conventional image formats with the least possible compression possibilities. If your page contains images of JPEG and PNG format, convert them into JPEG 2000, JPEG XR, and WebP. These image formats have superior compression properties. In order to serve images in next-generation formats, here are 2 techniques you can use implement
EWWW Image Optimizer WordPress Plugin
If you are working with WordPress content management system, use EWWW Image Optimizer for high compression without compromising visual quality. After embedding this plugin, you will get an interface with:-
- Basic settings
- Advanced settings
- Conversion settings
- WebP settings
It has a smart function to scan for all non-optimized images. Once identified, set the compression level for image formats like JPG, PNG or GIF etc. Moreover, you will also have the option to compress PDF files to attain a higher optimization level.
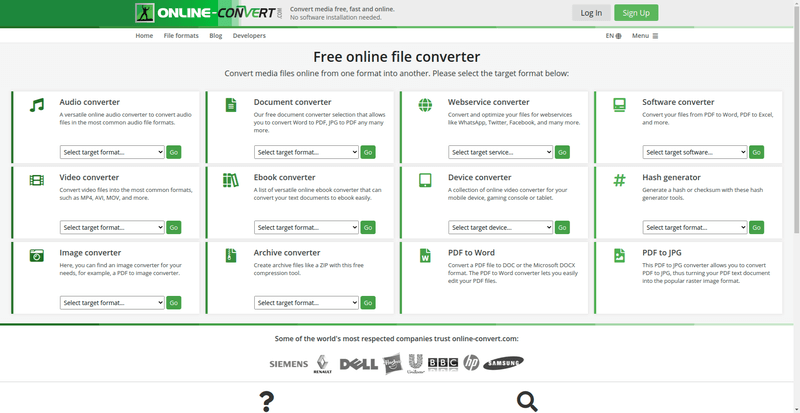
Sometimes, excess plugins slow down the processing of your content management system. You can try online tools as an alternative in that case. Online-Convert is a feature-rich online conversion tool that enables you to change the image format into WebP with some easy steps. Below are some features of this free online tool one can access:-
- Import image from physical memory, cloud storage or from a URL.
- Filters to change the color scheme from colored to B&W, monochrome or negative etc.
- Customize DPI
- Crop pixels from the top, bottom, right and left.
After converting, you have to upload all images manually by replacing the old ones.
Defer Offscreen Images
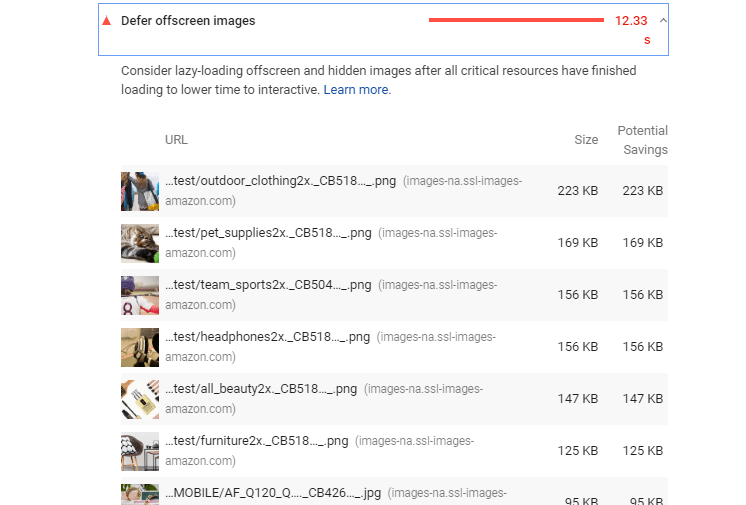
Images occupy space in your web pages actively as well as passively. There are some offscreen and hidden images occupying several kilobytes of space. These are among the major reasons why our page loads slower than expected. All the defer screen images are identified in the opportunities section of the Lighthouse results list. You can identify images that are useless and remove them. Below are some reliable tools to do it conveniently.
Lazy Load Optimizer WordPress Plugin
WordPress supports “Lazy Load Optimizer” plugin to speed up the page loading process. This plugin uses “lazysizes” library of GitHub which is an SEO-friendly loader capable of processing iframes and images. It smartly identifies all visibility changes occurred through JavaScript, CSS or manual interactions by the user. This plugin contains some interesting features such as:-
- Customizable loading effects
- Change-remove of image
- Size adjustment in pixels
- Setting animation time in milliseconds
- Customizable background colors
You can configure it with any WordPress version of 4.0 or higher. It is a lightweight plugin that smartly fixes “defer offscreen images” error. Download lazysizes.min.js script and embed the library with your web page. Use these scripts to execute:-
<script src=”lazysizes.min.js” async=””></script>
Or:
import ‘lazysizes’;
// import a plugin
import ‘lazysizes/plugins/parent-fit/ls.parent-fit’;
Defer offscreen images manually with LazySizes javascript
Those who have good control over HTML coding can defer offscreen images manually. We are simplifying your task by providing a dedicated javaScript to defer. Download Lazysizes JavaScript library from here and embed it with your targeted page with this script tag:-
Open your page in HTML view and find all “HTML tags”. Change “src” attributes to “data-src” and add class=“lazyload” attribute to the images as we are mentioning below:-
<!–Use data-src. And, specify lazyload class –>
Once you make all changes as per the instructions, all offscreen images will defer automatically. It is advisable to use Lazysizes library with WebP and responsive images for better results.
Reduce Server Response Times (TTFB)

Slow server response time is another factor affecting your speed performance. As per the parameters of the PageSpeed Insight tool, an audit fails if the server is taking more than 600 milliseconds to respond. When a user enters the URL, the server follows a long process to return the desired page. The lighthouse report calculates the time taken by a browser to get the first bite of data from the server. Upgrading server and optimization of the server’s application logic can help in improving the server response time. One can reduce server response time with the following techniques:-
Cache Enabler – WordPress Cache Plugin
Caching is among the most effective techniques to reduce server response time because it accelerates the accessing time of HTML files. Rather than depending on the dynamic HTML data produced by the server every time, you can create static HTML files. The Cache Enabler – WordPress Cache plugin create static files and save them in the server disk. Some of the significant features one can notice in this plugin are:-
- A faster disk cache engine
- Capable of minifying both inline JavaScript and HTML
- Options of manual or automated cache clearing
- Responsive images support via srcset
This plugin supports any version of WordPress including 4.6 and above and requires PHP 5.6 or above.
Shift to a reliable VPS Hosting Plan
The virtual private server hosting is a reliable solution to reduce server response time. In shared hosting, the server resources are shared between multiple websites. More websites in shared hosting mean increasing the time for the server to respond. On the other hand, a virtually private server is dedicated to every single website in VPS hosting plans. Here is a list of features to consider:-
- Options of 2 or 4 CPU cores
- Dedicated 2GB or 6GB RAM
- RAID 10 SSD of 40GB or 120GB
- Bandwidth options of 1000GB and 3000GB
Eliminate Render-blocking Resources
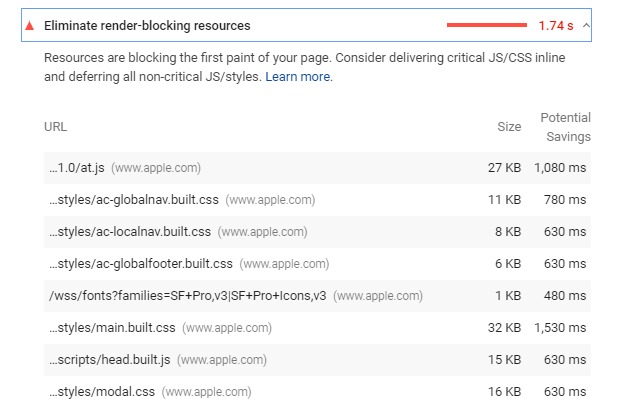
Render-blocking URLs are accountable for delaying or blocking the first paint of a web page. Lighthouse classifies three types of render-blocking URLs including HTML imports, scripts and stylesheets. In order to remove the barriers, first of all, you need to identify the critical sources. The coverage tab in Chrome DevTools will show you which URLs are critical and which are not. For the convenience of a user, green color is dedicated to critical and red for non-critical sources. After identifying, you can remove the useless render-blocking URLs. If you are looking for some effective tools to eliminate render-blocking resources, try the following options.
W3 Total Cache WordPress Plugin
In order to eliminate the render-blocking resources, try W3 Total Cache WordPress Plugin. The Web Performance Optimization framework of this tool has a content delivery network integration feature to improve the website loading speed. After installation of this plugin, you need to enable “Minify” mode in WordPress. It is capable of fetching render-blocking CSS and JavaScript. Some of the significant features of this plugin are:-
- Ideal for optimizing mobile-friendly websites enabled with Secure Socket Layer
- Full configuration can improve 10X speed
- Improve web server performance
- Saves up to 80% bandwidth by compression and minifying
HTML and JavaScript Compressor Online Tool
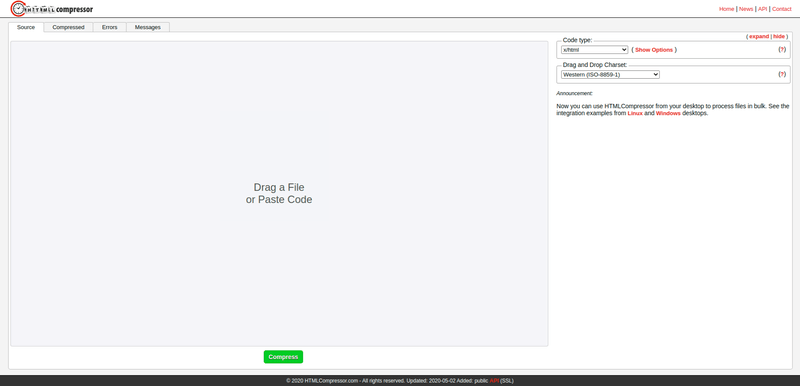
You will find online tools that can eliminate render-blocking resources but consumes a lot of time because of the manual operational work or dedicated scripts processing only. If you are looking for a tool capable of compressing all scripts including JavaScript, HTML and CSS altogether, go with this online option. Along with compression, it is also capable of identifying the errors. Below is a process of using this tool:-
- When you open the URL, there will be a blank space to add the source. Either drag and drop the file or copy and paste the code.
- Select the code types from X/HTML, CSS and JavaScript including PHP, Smarty or ASP.
- Select your charset from all standards available in the list and click on “compress”.
- With a 100% compression ratio, it will show you the total bytes that were saved.
Remove Unused CSS
CSS is the crucial requirement of a web page for looking awesome. However, some parts of CSS unnecessarily occupy space and results in delayed loading. These are known as dead rules of a style sheet occupying some extra bytes on your web page. Whenever a user accesses your web page, external style sheets are downloaded by the server that delays the loading time. With the help of Chrome DevTools, you can identify the critical and non-critical CSS. If removing some part of CSS is not going to affect your web page, do it.
Asset CleanUP WordPress Plugin
Before you compress the CSS script, it’s better to remove its useless parts. While creating a webpage, developers include a set of several HTML elements such as icons, tables, typography, search bar and galleries etc. generally, developers include all elements in a single “style.css” page whether they are useful or not. The Asset CleanUP WordPress Plugin can help in removing unnecessary elements conveniently. Here is a list of some of the features you need to check out:-
- Reduces the number of HTTP requests
- Minify JavaScript and CSS files
- Remove meta tags, links and HTML elements comprising within header and footer
- Disable XML-RPC protocol partially or completely
With its pro version, you will also get features like unloading JavaScript/CSS files, defer CSS, Move JS file and premium support.
PurifyCSS Online in your browser
If your WordPress is already overcrowded with a lot of plugins, try some online tools.PurifyCSS Online tool can remove unused CSS by scanning HTML and JavaScript source codes. You can install it via NMP by following this standalone installation code:-
npm i -D purify-css
import purify from “purify-css”
const purify = require(“purify-css”)
let content = “”
let css = “”
let options = {
output: “filepath/output.css”
}
purify(content, css, options)
Also, there are options to install the plugins of PurifyCSS Online tool on development stacks inclucing:-
1) Grunt
grunt.loadNpmTasks(‘grunt-purifycss’);
2) Gulp
var purify = require(‘gulp-purifycss’);
gulp.task(‘css’, function() {
return gulp.src(‘./public/app/example.css’)
.pipe(purify([‘./public/app/**/*.js’, ‘./public/**/*.html’]))
.pipe(gulp.dest(‘./dist/’));
});
3) Webpack
npm i -D purifycss-webpack purify-css
Visit the GitHub library of Purify CSS to know the usage process in detail.
Minify JavaScript
If the boot-up time of JavaScript is too high, it will negatively affect the page loading speed. Excess of JavaScript increases your memory cost, execution cost, network cost and parse & compile cost. Minifying, compressing and removing unused codes can help in giving a boost to your page loading performance. It is also advisable to cache your code because it will decline the rate of your network trips. Here are two feasible options to minify JavaScript:-
Merge + Minify + Refresh WordPress Plugin
This is a multipurpose plugin meant for boosting up the speed of a website by merging JS and CSS files in combined groups. After merging, the tool smartly minifies JavaScript with Google Closure. In the case of CSS, it uses “Minify” for the same purpose. In order to use the plugin files, you need to open apache and copy this code in it:-
#Serve gzip compressed CSS files if they exist and the client accepts gzip.
RewriteCond %{https:Accept-encoding} gzip
RewriteCond %{REQUEST_FILENAME}.gz -s
RewriteRule ^(.*).css $1.css.gz [QSA]
#Serve gzip compressed JS files if they exist and the client accepts gzip.
RewriteCond %{https:Accept-encoding} gzip
RewriteCond %{REQUEST_FILENAME}.gz -s
RewriteRule ^(.*).js $1.js.gz [QSA]
#Serve correct content types, and prevent mod_deflate double gzip.
RewriteRule .css.gz$ – [T=text/css,E=no-gzip:1,E=is_gzip:1]
RewriteRule .js.gz$ – [T=text/javascript,E=no-gzip:1,E=is_gzip:1]
Header set Content-Encoding “gzip” env=is_gzip
Some significant features to expect in this tool are:-
- Merge and minify javaScript
- Enables a web page to automatically reprocess all changes of JS and CSS by using last modified date.
- Capable of enabling http2 server push
- You can turn off concatenation and minification
- No compatibility issue with localized scripts
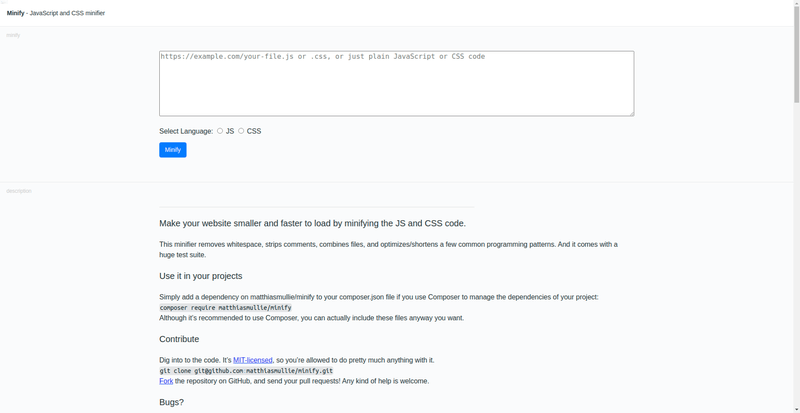
It has a simple interface where you just need to copy and paste the scripts, select between JS and CSS and execute the minification process. With “Minify Online” tool, you will be able to identify and remove combined files, whitespace, strips and comments. Use this code to configure minification with your web page:-
use MatthiasMullieMinify;
$sourcePath = ‘/path/to/source/js/file.css’;
$minifier = new Minifyjs($sourcePath);
// we can even add another file, they’ll then be
// joined in 1 output file
$sourcePath2 = ‘/path/to/second/source/css/file.css’;
$minifier->add($sourcePath2);
// or we can just add plain js
$js = ‘body { color: #000000; }’;
$minifier->add($js);
// save minified file to disk
$minifiedPath = ‘/path/to/minified/css/file.js’;
$minifier->minify($minifiedPath);
// or just output the content
echo $minifier->minify();
Efficiently Encode Images
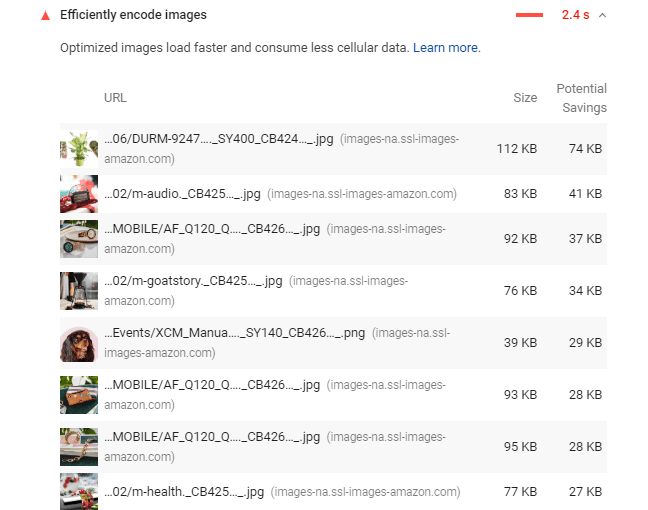
Here is another smart technique for reducing the size of images. Among the entire content available on your web page, images occupy most of the space that is why they become a major reason for slow loading. The Lighthouse service of Google examines every single content to flag images with their size. After setting the compression level of every image 85, if it finds the potential saving is more than 4 kilobytes, the image comes in the category of “Optimizable”. Use your GUI tools to optimize the images before uploading and reduce the use of GIFs. Follow these effective techniques for desired results:-
Smush – Compress, Optimize and Lazy Load Images WordPress Tool
A large number of image compression plugins must be available for WordPress speed optimization but all of them are not capable of maintaining optimum quality after processing. With Smush, an image can go to a maximum compression level without compromising visual quality. It can smartly examine the entire page to figure out images affecting loading speed. Below is a list of significant features you must need to know:-
- It strips out the data of an image that has nothing to do with the image’s visual quality.
- The plugin is capable of compressing images in all directories as well as the images of WordPress themes and plugins too.
- Smush is compatible with almost every builder, library and plugin that we frequently use.
- The smart size detection feature of this tool is capable of identifying images with incorrect size for the convenience of selection.
Kraken Online image optimization tool

Without even configuring a plugin, you can attain an optimum level of image encoding and compression with online tools. Kraken is a free tool but some of its features are available for premium users only. Still, the features in freeware are enough to serve the purpose. Check out some features of this tool:-
- It comes with multiple options for uploading the image including exploring source files in the PC, drag and drop, uploading zip file or importing from cloud storage of Box, Google Drive and Dropbox. “Page Cruncher” and “URL Paster” options are also available but for Pro users only.
- There are three options of image optimization including expert, lossless and lossy.
- You can upload images in bulk at a time rather than processing each of them one by one.
- Along with JPEG and PNG, it can also optimize the size of GIF files.
Enable Text Compression
Each byte and kilobyte contributes to slowing down the speed of your web page. Therefore, consider all the elements whether it is an image, JavaScript, CSS or just plain text. If your text is compressed, the server will respond much faster than the text without compression. You can enable the “Brotli” compression format in the server to compress every piece of text content. In order to compress your text content on a web page, we recommend two reliable techniques below:-
Enable Gzip Compression WordPress Tool
After enabling the text compression feature, this plugin automatically reduces the storage space occupancy of text material. It supports the Apache HTTP server to configure. The plugin uses Gzip algorithm to compress text size. Anyone having a WordPress version 3.0.1 and above can configure this plugin. As you update the text content, it will automatically execute the compression process without requiring manual interference.

All plugins we configure with WordPress only supports Gzip compression. If you are looking for versatile features and want to harness all tasks of compression manually, it is advisable to go with the option of TxtWizard. Some versatile features of this amazing tool are:-
- Compression options of Gz, bzip2 and deflate
- Decompress the already compressed text
After processing, it will display the compression ratio and comparison between the original and compressed versions.
Diagnostics
After utilizing all opportunities, still, there is some room for website speed optimization. The diagnostic part of PSI doesn’t directly affect the performance score but provides additional information regarding improvement. Following the diagnostic techniques will help you in adhering to the best web development practices.
Serve Static Assets With an Efficient Cache Policy
Caching HTTP is another smart technique to speed up the page loading time when someone visits a website repetitively. While requesting a URL for the first time, the browser gets it from the network and then temporarily store the resource. Using HTTP Caching and verifying cached response in Chrome DevTools, you can optimize the website speed on repeat visits.
Ensure Text Remains Visible During Webfont Load
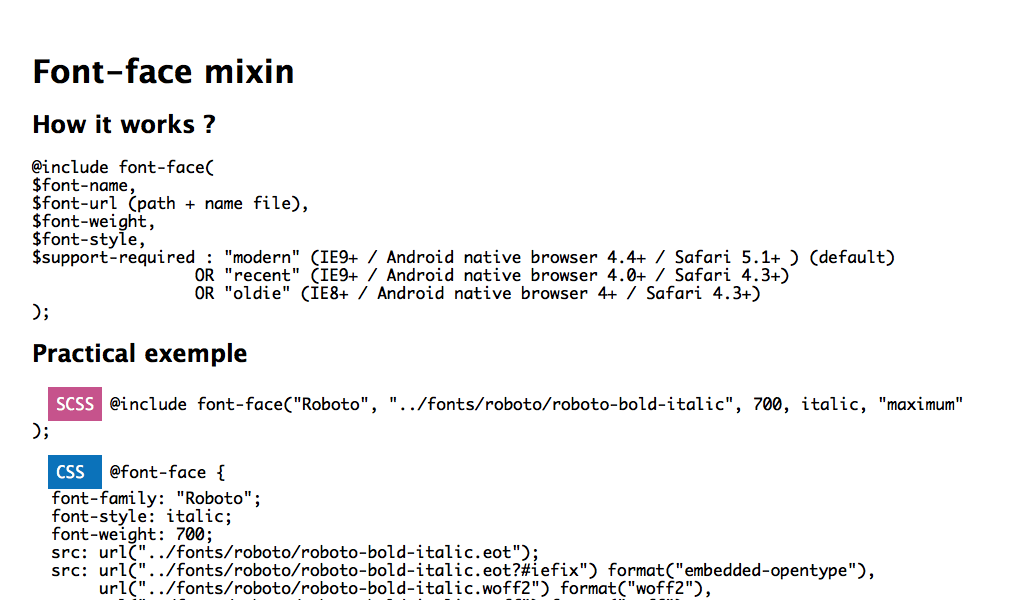
When you request a URL in the browser, the server brings back results including all elements present on a particular web page. Apart from text, video links, images, HTML and CSS, Webfont is also a crucial thing that will take some time to load. If the Webfont of your page is taking too much time for loading, the text content will hide causing Lighthouse font-display audit fails. In order to solve the issue of invisible text, you need to show a temporary system font by including “font-display: swap” in “@font-face” styles. It means instructing the browser to use a system font temporarily until the Webfont is not loaded.
Avoid Enormous Network Payloads
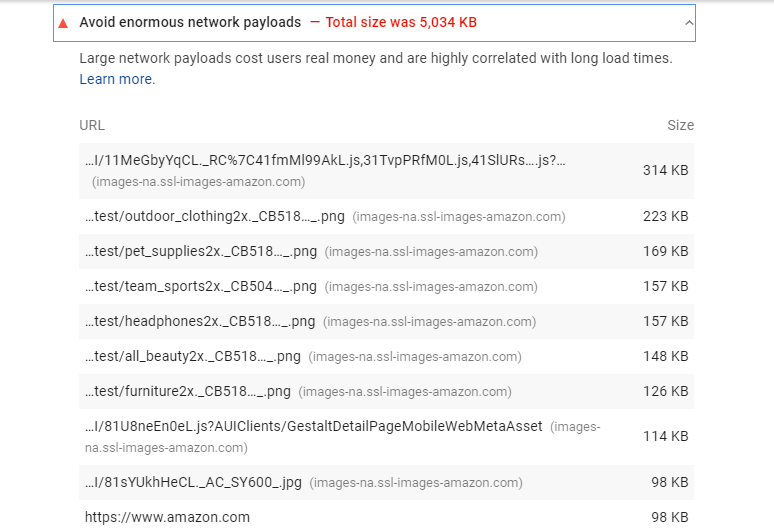
The actual data and header information are two different things transported in the network packets. Header information is meant for transmitting actual data that is called “payload”. If your web page is transmitting large network payloads, the speed of loading will surely decrease. In order to avoid enormous network payloads, you need to reduce the size of network requests. Defer, optimizing and caching of requests will help you in improving the loading speed.
Minimize Main-thread Work
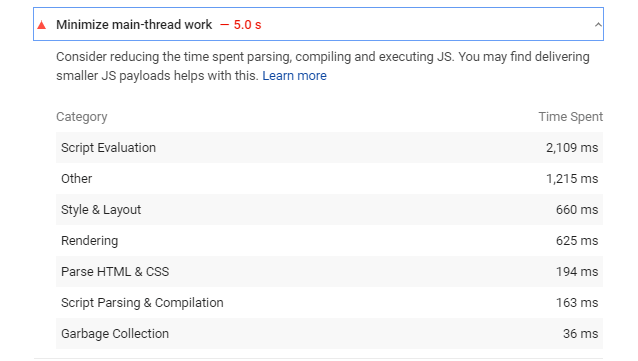
For displaying a web page, a browser executes all crucial tasks like parsing and executing JavaScript HTML and CSS in the main thread. If the main thread render process is long, page loading speed will slow down. Lighthouse flag the pages that are keeping the main-thread busy for more than four seconds. The total time spent on rendering elements like script evaluation, style layout and script parsing is calculated in milliseconds. Removing unused codes, compressing and minifying critical codes will help you in minimizing the main-thread work.
Reduce JavaScript Execution Time
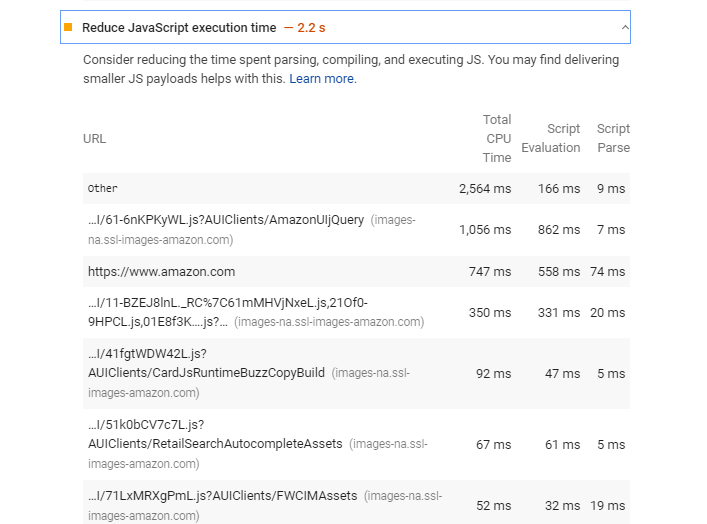
JavaScript in a web page is responsible for triggering visual changes. However, long-running and badly timed javaScripts reduces the page loading performance. The JavaScript execution time audit fails if it is taking longer than 3.5 seconds. Even the Lighthouse shows warning if it is taking time for more than 2 seconds. In order to reduce the time of javaScript execution, use requestAnimationFrame and web workers.
Avoid an Excessive DOM Size
Document Object Model (DOM) is actually the web page on which you are compiling all the data. If the web page contains more than 1500 nods, it will affect the loading performance. Huge DOM size means taking a long time for page rendering. Using a light theme, different sliders, simple web builders and fewer widgets can help in reducing the size of the Document Object Model. However, redesigning the entire page from scratch is a more feasible option but it will consume more time. Below is a list of some DOM size checking and optimization tools for your convenience:-
Avoid Chaining Critical Requests
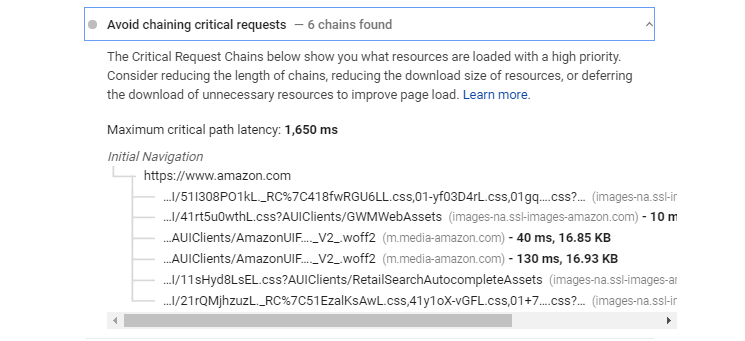
The resources i.e. PHP, JavaScript, and CSS loading with high priority are chained in a sequence. If there is a long chain of critical requests, the browser will take more time for downloading. The “Chrome Resources Priorities and Scheduling” feature of Google will tell you the priorities in a sequence. You can reduce the chain by excluding unused elements or deferring their download. Optimizing the above-mentioned contents such as WebFonts, JavaScript and images etc can also help you in this concern.
Keep Request Counts Low and Transfer Sizes Small
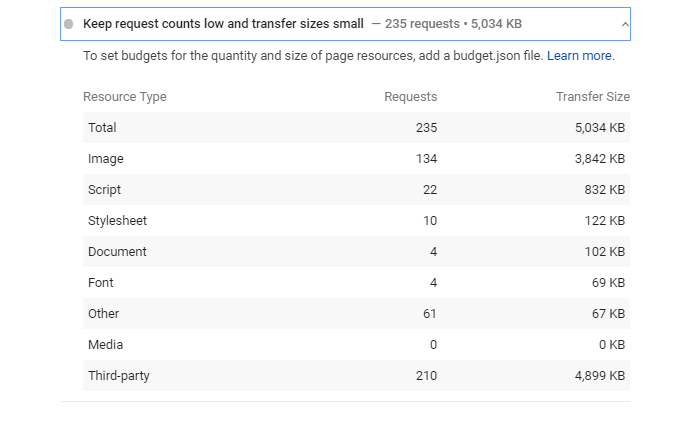
During the process of page loading, a certain number of network requests and bytes of data is transferred. The PageSpeed Insights tool is capable of identifying all resource types, network requests and the amount of transferred data by each resource. Generally, scripts, images and third party resources are responsible for high request counts and data transfer size. A budget.json file can help you set the limits of data and request counts.
Considerable Precautions While Implementing by Yourself
1. Version incompatibility
While embedding a metric optimization plugin with WordPress, you may need the help of short scripts. The version incompatibility issue may occur with both WordPress and its plugins. For instance, it may be possible that a code you are implementing supports the plugin but not the current version of WordPress. If you are just copying and pasting a piece of script without knowing the version compatibility, the website will partially or completely stop working.
2. Image quality compromise
A large number of free online tools are available to compress the images and change their formats. The online applications or plugins may help you in changing the conventional image formats into JPEG 2000, JPEG XR, and WebP but don’t take responsibility for maintaining graphic quality. Also, the compression process may reduce the image quality to a very poor level. In many cases, it is seen that DIY techniques of optimization result in poor image quality that further badly affect the user experience. Therefore, it is advisable to find someone professional having adequate knowledge of compression quality parameters.
3. Errors while minifying JS and CSS
Minifying JS and CSS help a lot in reducing the loading time from the back end. However, the tools you are using to minify may not be reliable. Minification done by automated tools may not execute the process as expected. This will also end up with the whole site down. Also, you can’t implement minification everywhere. For example, a minified JavaScript for Datepicker results in malfunctioning in your online forms. If that particular form is frequently used by the end-users, the malfunctioning will affect much adversely worse than a complete site down.
4. Script Clash
A clash between libraries like jQuery or prototype.js creates serious consequences. Implementing scripts without proper knowledge is a major reason behind a downed website. In order to avoid conflicts with different libraries, you need the help of a professional who knows how to test a jQuery in no conflict mode before using on a live page.
Now you must be fully enlightened with the significance of page speed optimization for improving user experience. It is clear that every single byte of a script, multimedia and text content matters a lot for improving the loading speed and making a web page fully interactive. However, some optimization activities are tricky to perform without prior experience. If anything went wrong in the middle of your DIY experiments, it may shut down the entire website. In such kinds of situations, only a professional web developer can help in identifying the fault and rectifying it with the best possible practices.